• Deutsch
  • Français
Logo TGS 3D

Christl Aubry-Brückner
Training for physiotherapists

Logo TGS 3D

Treatment

Orthopedic treatment

  1. Physiotherapy in General

Physiotherapy is the most important treatment for scoliosis. Its application must be adapted:

  • to the form of scoliosis,
  • to the degree of scoliosis,
  • to the patient’s age.

If it does not achieve the expected results, orthopedic treatment (a brace) should supplement physiotherapy.

  1. The Brace

The brace corrects existing deformities and allows for a more harmonious development of the spine during the remainder of bone growth. It evolves alongside the morphology of the child and then the adolescent.

It is often recommended for moderate to severe forms of scoliosis.
Brace therapy typically begins at 20° of curvature (Cobb angle).

  1. Surgical Treatment

Surgical intervention is performed when physiotherapy and the use of a brace prove insufficient. Surgery is conducted at the end of growth to avoid future complications. The curvature of the spine is corrected using rods, for example, which are designed to keep the vertebrae aligned at their lowest possible curvature.

  1. Postural Correction Movements

The Charlie Puppet is a movement suitable for everyone; it represents the physiological posture of our body.

Groups of Scoliosis:

  • Thoracic
  • Thoraco-lumbar
  • Lumbar
  • Double major

Goal: Strengthen the vertical physiological standing posture.

Posture:

  • The patient stands upright in a physiological position.
  • The pelvis, shoulders, and spine are centered.
  • The heels are positioned vertically under the hip joints.
  • The feet are slightly turned outwards (11:05 position), meaning the forefoot and toes point slightly outwards.
  • The toes are flat on the ground.
  • The arms are relaxed and hang naturally along the sides of the body.
  • The chin is tucked in.
  • The patient’s gaze is horizontal.

Action:

  • The toes press flat on the ground without tension, and the big toe (hallux) should never lift.
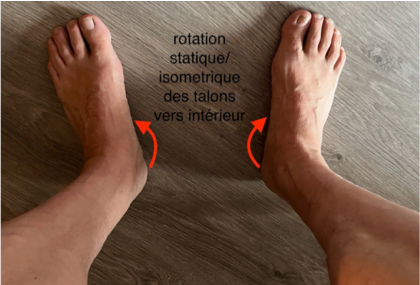
  • The heels create an inward tension but remain firmly on the floor. (This inward tension/rotation is essential to activate the pelvic floor muscles.)
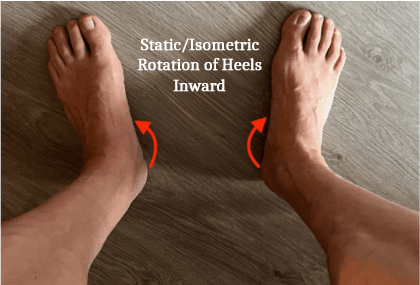
  • If the patient struggles to understand the heel rotation movement, start with the following instructions:
    • The arch of the foot or the inner ankle lifts while keeping the toes flat on the ground.
    • The tibia or knee turns slightly outward.
  • The knees are straight but without hyperextension, and the kneecaps are slightly turned outward.
  • Contract the pelvic floor muscles, especially the anus. (Imagine the anus being pulled towards the centre of the body and upward) or imagine pulling the coccyx forward (counter-nutation) without contracting the glutes.
  • Contract the lower gluteal muscles, trying to “tuck them under the pelvis” and squeeze the glutes as much as possible.
  • Contract the lower abdominal muscles (below the navel) and lift the pubic bone upward. (Avoid excessive pelvic tilt to prevent lumbar kyphosis.)
  • The person tightens the anus (A), the glutes (G), and the belly (B) below the navel.
  • A helpful mnemonic: AGB– remember the order Anus, Glutes, Belly to maintain the correct sequence of muscle contractions.
  • Do not change the order of movements – AGB+++!
  • Imagine a string attached to the top of the head, gently pulling the person upwards towards the ceiling. (“Puppet string” instruction for light self-lengthening, but not to the maximum).
  • The shoulders remain relaxed. The shoulder blades slide gently downwards and towards the spine.
  • Caution: The shoulder blades should not come together horizontally!

At first, this movement is repeated without staying in the position for long to create automaticity.
Once the movement is mastered, the patient is left in this position for as long as possible.

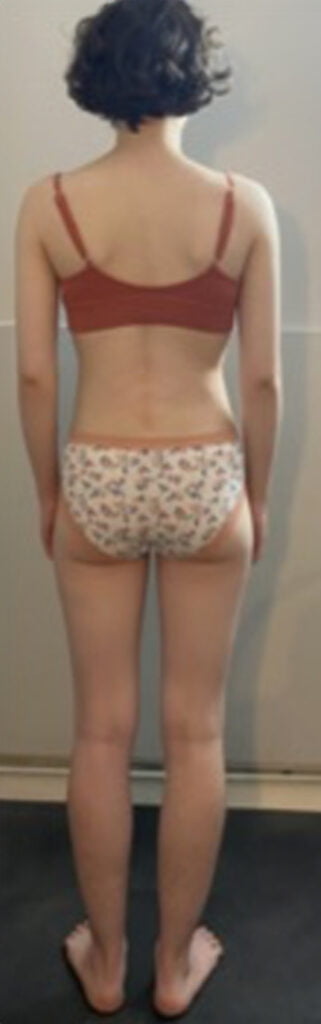
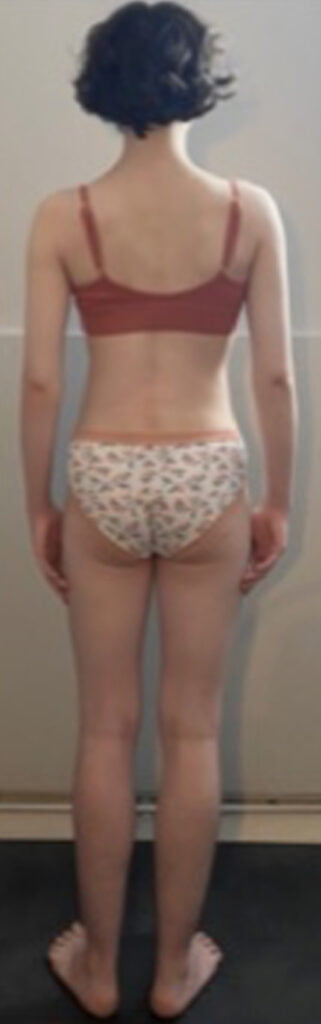
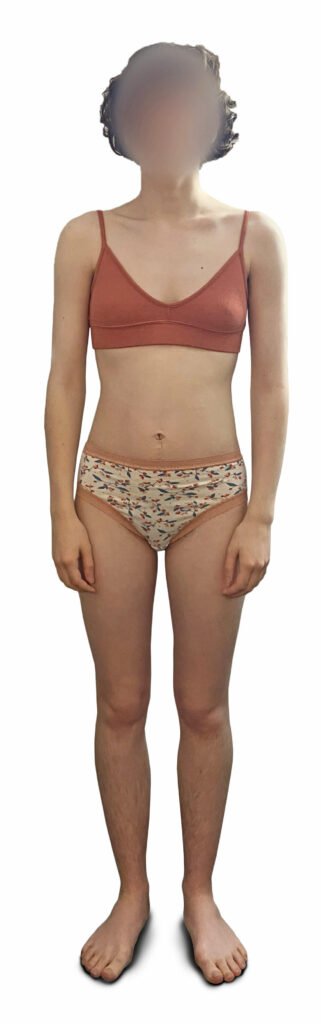
Comparison of Neutral and Charlie Postures:

Neutral position
Charlie position
Neutral position
Charlie position

Example of Neutral Position:

  • The position of the knees is different, and they are in extension.
  • The pelvis is shifted to the right.
  • The stomach is pushed forward.
  • The glutes are relaxed (pear-shaped).
  • The shoulders are hunched forward.
  • The left shoulder is raised (more inclined clavicle).

Charlie Position:

  • he knees are almost in a physiological position (slightly bent).
  • The pelvis is centered.
  • The stomach is flatter.
  • The shape of the abdominal waist…
  • The glutes are contracted (apple-shaped).
  • The shoulders are more open.
  • The left shoulder is no longer raised.
Surgical treatment

Surgical intervention is performed when physiotherapy and the use of a brace prove insufficient. It is carried out at the end of growth to avoid any future complications. The spinal curvature is corrected using metal rods designed to keep the vertebrae aligned with the least curvature possible.

  1. Physiotherapy in General

Physiotherapy is the most important treatment for scoliosis. Its application must be adapted:

  • to the form of scoliosis,
  • to the degree of scoliosis,
  • to the patient’s age.

If it does not achieve the expected results, orthopedic treatment (a brace) should supplement physiotherapy.

  1. The Brace

The brace corrects existing deformities and allows for a more harmonious development of the spine during the remainder of bone growth. It evolves alongside the morphology of the child and then the adolescent.

It is often recommended for moderate to severe forms of scoliosis.
Brace therapy typically begins at 20° of curvature (Cobb angle).

  1. Surgical Treatment

Surgical intervention is performed when physiotherapy and the use of a brace prove insufficient. Surgery is conducted at the end of growth to avoid future complications. The curvature of the spine is corrected using rods, for example, which are designed to keep the vertebrae aligned at their lowest possible curvature.

  1. Postural Correction Movements

The Charlie Puppet is a movement suitable for everyone; it represents the physiological posture of our body.

Groups of Scoliosis:

  • Thoracic
  • Thoraco-lumbar
  • Lumbar
  • Double major

Goal: Strengthen the vertical physiological standing posture.

Posture:

  • The patient stands upright in a physiological position.
  • The pelvis, shoulders, and spine are centered.
  • The heels are positioned vertically under the hip joints.
  • The feet are slightly turned outwards (11:05 position), meaning the forefoot and toes point slightly outwards.
  • The toes are flat on the ground.
  • The arms are relaxed and hang naturally along the sides of the body.
  • The chin is tucked in.
  • The patient’s gaze is horizontal.

Action:

  • The toes press flat on the ground without tension, and the big toe (hallux) should never lift.
  • The heels create an inward tension but remain firmly on the floor. (This inward tension/rotation is essential to activate the pelvic floor muscles.)
  • If the patient struggles to understand the heel rotation movement, start with the following instructions:
    • The arch of the foot or the inner ankle lifts while keeping the toes flat on the ground.
    • The tibia or knee turns slightly outward.
  • The knees are straight but without hyperextension, and the kneecaps are slightly turned outward.
  • Contract the pelvic floor muscles, especially the anus. (Imagine the anus being pulled towards the centre of the body and upward) or imagine pulling the coccyx forward (counter-nutation) without contracting the glutes.
  • Contract the lower gluteal muscles, trying to “tuck them under the pelvis” and squeeze the glutes as much as possible.
  • Contract the lower abdominal muscles (below the navel) and lift the pubic bone upward. (Avoid excessive pelvic tilt to prevent lumbar kyphosis.)
  • The person tightens the anus (A), the glutes (G), and the belly (B) below the navel.
  • A helpful mnemonic: AGB– remember the order Anus, Glutes, Belly to maintain the correct sequence of muscle contractions.
  • Do not change the order of movements – AGB+++!
  • Imagine a string attached to the top of the head, gently pulling the person upwards towards the ceiling. (“Puppet string” instruction for light self-lengthening, but not to the maximum).
  • The shoulders remain relaxed. The shoulder blades slide gently downwards and towards the spine.
  • Caution: The shoulder blades should not come together horizontally!

At first, this movement is repeated without staying in the position for long to create automaticity.
Once the movement is mastered, the patient is left in this position for as long as possible.

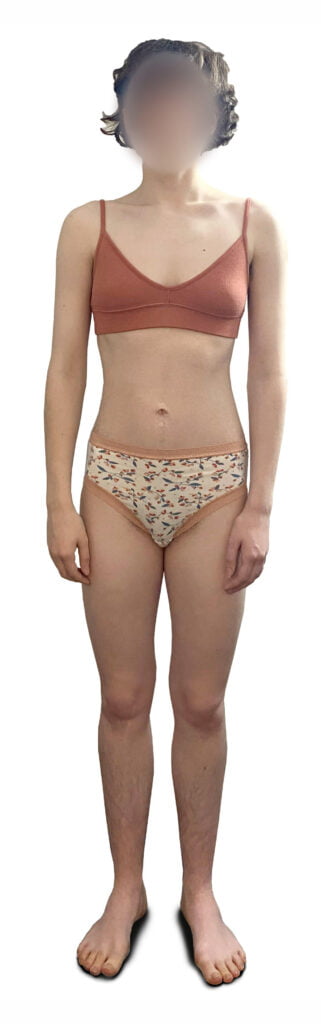
Comparison of Neutral and Charlie Postures:

Example of Neutral Position:

  • The position of the knees is different, and they are in extension.
  • The pelvis is shifted to the right.
  • The stomach is pushed forward.
  • The glutes are relaxed (pear-shaped).
  • The shoulders are hunched forward.
  • The left shoulder is raised (more inclined clavicle).

Charlie Position:

  • he knees are almost in a physiological position (slightly bent).
  • The pelvis is centered.
  • The stomach is flatter.
  • The shape of the abdominal waist…
  • The glutes are contracted (apple-shaped).
  • The shoulders are more open.
  • The left shoulder is no longer raised.
neutral position
Charlie position
Neutral position
Charlie position